Topics Map > Canvas
Canvas (Peoplesoft) - SIS Status Tool for Troubleshooting Enrollments
This article is for campus Canvas administrators at the Universities of Wisconsin institutions participating in the Digital Learning Environment (DLE). The DLE has developed a custom UWS Tool called the "SIS Status Tool." It allows Canvas users with the "Institution Admin" or "Account Admin" roles to monitor Student Information System (SIS) imports into Canvas, helping them troubleshoot student and instructor enrollment errors as the information flows from the campus SIS (aka PeopleSoft), through middleware named Kimono (aka Elevate Data Sync), to Canvas.
SIS Status Tool
The SIS Status tool should be used to aid troubleshooting when there is a question about enrollments or you suspect there is an issue with the data feed from the Student Information System.
Following a string of SIS Import issues in Fall 2022, the UWSA Digital Learning Environment team also recommends that campus Canvas administrators check the SIS Status Tool daily after 10 AM for fresh SIS Imports for their campus.
To determine if there are issues with a campus's SIS Imports into Canvas, use the SIS Status tool to do three things:
- Verify the date/time of the last completed integration from the SIS. For nightly bulk integration, you should see 3 entries per day, six days a week. For events based integration, there should be several updates per business day. The date/time on the display is UTC (2020-03-24T11:26:22Z), so subtract 6 hours to convert to Central Time for the start and updated time.
- If you do not see recent integrations in Canvas, check with your campus's SIS support team to verify that the jobs are running in PeopleSoft.
- If the SIS jobs are running as normal with no errors from PeopleSoft, then log a ticket with Instructure Tier 1 support (go to Canvas > Help) explaining the enrollment issue you are seeing in Canvas and requesting that Instructure escalate the ticket to their SIS Team. You should then escalate the Canvas case to our Instructure Customer Success Manager and to the DLE Team, following the instructions in the Escalating tickets in Canvas Support guide.
Using the SIS Status Tool
To use the tool, follow these steps:
1. Log in to Canvas, go to Admin in the global navigation on the left, choose your Institution's SIS subaccount (usually named "UW [Your Institution] - Instructional SIS Courses").
2. Once in the sub-account, select the UWS TOOLS from the admin navigation on the left.
3. Select SIS Status button. Note: it may take a while to return information due to the volume of data.

4. You should see a screen with the latest SIS data files sent from the SIS to your sub-account, ten to a page.
On 06/09/2020, the tool was updated to check the most recent 1000 SIS imports for imports sent to your sub-account, so that campuses using events-based-processing (which sends many small files) don't drown out the campuses using bulk processing (with fewer, but larger files).

Users can see the following information for each SIS import file:
- ID: A unique identifier for the SIS import file. The ID is also a link to the metadata for the file, including links to .csv versions of the files themselves.
- Campus: An abbreviation indicating the originating institution for the data. If you are using the SIS Status tool from your campus's Instructional sub-account, you should only see files from your Campus.
- Status: A description of where in the import process the SIS Status file is. Possible values are: created, importing, imported, and imported with messages.
- Percent: Progress indicator.
- Created: Date and time when the file exited Kimono and first touched Canvas.
- Started: Date and time when Canvas started processing file (this should be close to the Created time).
- Updated: Date and time that Canvas last took action to process the file.
- Ended: When Canvas finished processing the file. This is when the new courses and enrollments become available in Canvas.
Dates and times in the SIS Status Tool are in an abbreviated format that looks like this: "2020-06-04T14:37:29Z." Times are in "Zulu" or UTC time, 5-6 hours ahead of Central time.
5. The three sets of data imported during each bulk integration are:
a. Account – creates the connection between Kimono and Canvas and loads sub account level informationb. User – adds/updates users from the SIS (runs for event processing too)c. Enrollments – adds/updates term, course, section and enrollment data from the SIS (runs for event processing too)
The order of the data load is account, user, then enrollments, so you will see enrollments as the most recent set of data when looking at the status screen. The data in these files is sent from Kimono after it processes the files sent from SAIP in the SIS.
For the campuses using bulk processing (most campuses), each set of data sent over includes all current Users and Enrollments, not just updated ones. For campuses using events-based processing (only a few campuses), User and Enrollment information is sent continuously 24x7x365 with only recently updated information from the SIS in the data feed.
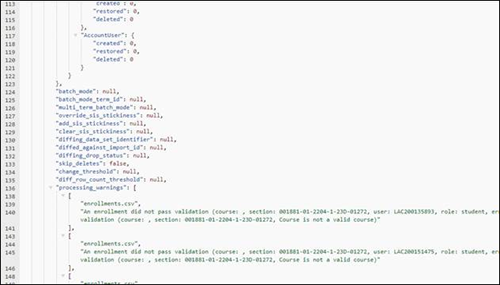
6. You may see “imported with messages” on the status. This is common. You can review the messages by clicking on the ID link and scrolling to the section of the message with “processing_warnings”. Many of the warnings are triggered when courses are uncrosslisted in the SIS after the initial data is sent to Canvas for a term.

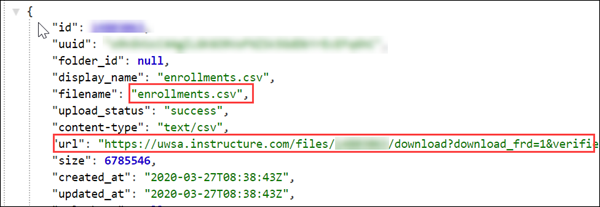
7. If you want to determine if a specific user or enrollment was included in the data sent to Canvas from the SIS files, click the ID link for the appropriate file you want to review.

Scroll to the end of the file. You will see a URL that allows you to download the file to your local machine. Please be careful when downloading files since some of the data is considered high risk data and should be protected.

The enrollments.csv file will be helpful to confirm if an enrollment is active. It will show the User ID, role, Section ID and status for the enrollment being sent from the SIS.
For campuses using events-based processing, the User Search tool will provide a link to the last file used to updated the enrollment. Search for the user, then find the course with the user enrollment issue. You can sort by term to move the most recent term’s courses to the top of the list. You will see the last SIS file set used to update the enrollment by clicking the SIS import ID for the course.

