
KB User's Guide - Settings Tab - Menus
To manage your menus and menu items, navigate to Settings tab > Menus.
Menus

Menu Options
Menu location
The location you choose has a significant impact on the layout of your KB site. Below are descriptions of each location option.
- Top Left and Top Right
Top Left and Top Right Links appear in a bar at the very top of the page in their respective corners. When multiple links are added to a Top Left or Top Right menu, they will be displayed horizontally, with the first link appearing the further left and progressing to the right.

- Link Bar - Between Logo and Search
When this location is selected, the search bar will be moved out from alongside the site logo and will instead display in a separate section below, with the Link Bar appearing between the logo and new search areas. When multiple links are added to a Link Bar, they will be displayed horizontally, with the first link appearing the further left and progressing to the right.
The image below shows a Link Bar between the logo and the search bar.

- Link Bar - Under Logo and Search
When this location is selected, the Link Bar will appear below the combined logo and search area. When multiple links are added to a Link Bar, they will be displayed horizontally, with the first link appearing the further left and progressing to the right.
The image below shows a link bar under the logo and search field.

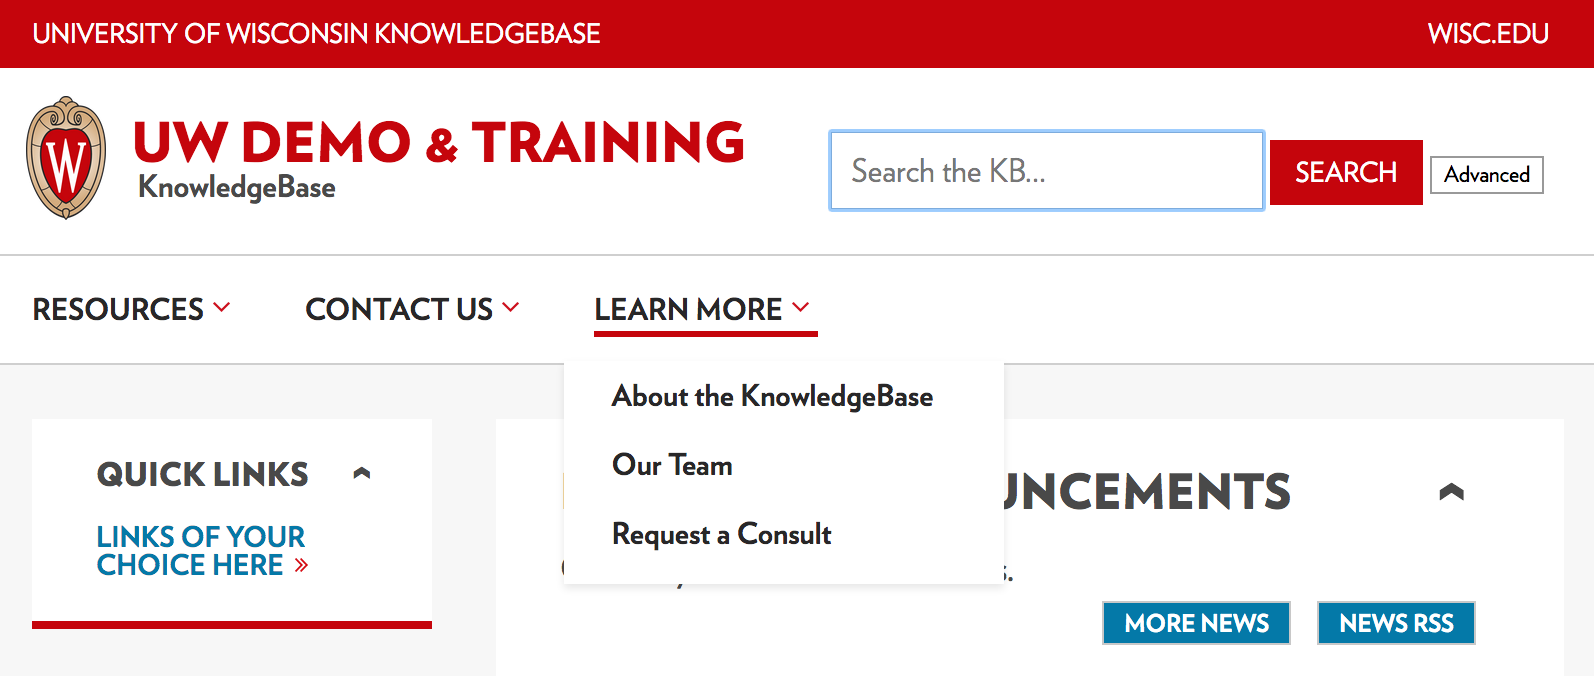
- Menu Bar Dropdown - Under Search
When this location is selected, the Menu Bar will appear below the combined logo and search area. Each menu added with this location represents its own dropdown menu in the Menu Bar area, ordered left to right, with the name of each menu displaying in the Menu Bar. When a user hovers over the dropdown name in the menu bar, the links will be displayed in a vertical list.
The image below shows the Menu Bar. Under the "Learn More" menu item, you will see three links to choose from in the dropdown menu.
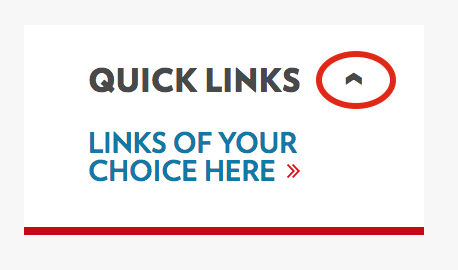
- Side Left and Side Right
When one of these locations is selected, a column will be created to the right and/or left of the main content area. Each menu added with this location will be a separate grouping of links in the column, ordered top to bottom. The menu name will be displayed at the top of the link grouping, and an expand/collapse arrow will appear next to the menu name.
If a user collapses a menu, their selection will be stored in a browser cookie, and this will be retained if the user goes back to your site in the same browser session. Additionally, UW-Madison sites configured with the new UW Theme layout will have menus auto-collapse at smaller screen widths.
These downward pointing arrows/ chevrons are accessible to those accessing the KB via a screen reader by means of the keyboard, specifically the space bar.
Menu name
The name of your menu. The name you enter here will be displayed to users if the menu location selected is "Menu Bar Dropdown - Under Search", "Side Left" or "Side Right". For the other menu locations, the menu name will only be referenced by admins working on this page in the KB Admin Tools.
If you are choosing one of the other menu locations, it is recommended you set the name to something simple like "Link Bar" or "Top Right Links" for easy reference.
Visibility Settings
-
Internal - Makes the menu visible on your internal site.
-
External - Makes the menu visible on your external site.
-
Full view - Makes the menu visible when your site is viewed on a desktop or laptop.
-
Mobile view - Makes the menu visible when your site is viewed on a mobile device.
-
Homepage - Makes the menu visible on your KB site homepage. (recommended)
-
Doc page - Makes the menu visible on all other pages within your KB. You may want to consider unchecking this for "Side Left" and "Side Right" menus, as these menus share space with your KB content.
Menu Order
The value in the Order field determines the order in which menus with the same location will appear on your site. The following rules are observed:
- The values in the order field do not need to be consecutive, for example, they can be numbered 5, 10, 15, and 20.
- If unspecified, the value in the "Order" field will default to "0".
- If multiple menus with the same location have the same value in the "Order" field, they will be displayed alphabetically by "Menu name".
- For menus that display horizontally ("Top Left", "Top Right", "Menu Bar Dropdown", and the two "Link Bar" locations), the order goes from left to right.
- For menus that display vertically ("Side Left" and "Side Right"), the order goes from top to bottom.
Create a New Menu
- Choose a location in the Menu location drop down menu where you want this menu to appear. See details on menu location.
-
Enter a name for your menu in the Menu name field. See details on menu name.
-
Check the Internal, External, Full view, Mobile view, Homepage and/ or Doc page check boxes as desired. See details on menu visibility.
-
In the Menu order field, enter a number. This field determines where this menu will appear relative to existing menus. See details on menu order.
-
Click the Add menu button to save the menu that you just created.
Update or Delete an Existing Menu
To update a menu:
-
-
Find the menu you wish to update and modify the desired settings as described in the Menu Options section.
-
Click the Update button at the bottom of the page.
-
To delete a menu:
-
Before deleting the menu, reassign any menu items you wish to retain to a new menu using the Menu name dropdown. Click Update at the bottom of the page to save your changes. If you do not, the menu items associated with the menu will also be deleted.
-
Click the Delete link to the right of the menu.
-
Click OK in the dialog window to confirm that you would like to delete the menu and any menu items still associated with it.
Menu Items

Menu Item Options
-
Link name - The text you would like to display for the menu item (required).
-
Link URL - The URL you would like to point to (required). If linking to a KB document, you need only enter the document ID number.
-
Menu name - The menu in which you'd like the link to appear. This dropdown will contain the names of all of your existing menus.
-
Internal - Makes the menu item visible on your internal KB site. Please note that the menu it is assigned must also be visible on your internal site.
-
External - Makes the menu item visible on your external KB site. Please note that the menu it is assigned must also be visible on your external site.
-
Popup - Makes the link open in a new browser window or tab.
-
Link order - Determines the order in which the menu items are displayed within the assigned menu. The following rules are observed:
- The values in the order field do not need to be consecutive, for example, they can be numbered 5, 10, 15, and 20.
- If unspecified, the value in the "Order" field will default to "0".
- If multiple items in the same menu have the same value in the "Order" field, they will be displayed alphabetically by "Link name".
- For menu items that display horizontally (in "Top Left", "Top Right", and the two "Link Bar" menus), the order goes from left to right.
- For menu items that display vertically (in "Side Left", "Side Right", and "Dropdown Menu Bar" menus), the order goes from top to bottom.
Create a New Menu Item
-
Enter the desired Link name and Link URL, then choose the Menu name you would like to add the item to. Check the boxes and set the Order field as desired. See the Menu Item Options section for more information on these settings.
-
Click the Add button to save the Menu Item that you just created.
Update or Delete an Existing Menu Item
To update a menu item:
-
-
Find the menu item you wish to update and modify the desired settings as described in the Menu Item Options section.
-
Click the Update button at the bottom of the page.
-
To delete a menu item:
-
Click the Delete link to the right of the menu item.
-
Click OK in the dialog window to confirm that you would like to delete the menu item.