Topics Map > Users Tab
KB User's Guide - Users Tab - Adding a User
Note
You must have full administrative permissions in your space to perform these steps. This means access to the Documents, Settings, and Users tabs.
Adding a New User to your KB Space
-
In the KB Admin Tools, navigate to the New User screen by going to the Users tab > Add a User.
-
Begin by filling in the new user's personal information in the text fields. An asterisk denotes that the field is required:
- NetID* - Enter the NetID or username
- Domain* - Enter the domain, (University of Wisconsin-Madison: wisc.edu, University of Chicago: uchicago.edu, etc).
- First Name* - First name.
- Middle Name - Middle name.
- Last Name - Last name.
- Email* - Email address.
- Phone Number - Phone number.
- Internal API password - Password to connect to the internal API for your group space.
- Local login password - This is for local authentication only (if you don't use your domain's authentication system, e.g., NetID authentication for UW-Madison).
Note: After entering a user's NetID or username, the rest of their personal information may auto-fill, and the text fields are grayed out and not editable. This occurs when the user already has a account in a different group in the KB. When this happens, a line of text will appear next to the NetID field telling you what their default group space is.
If you do not believe the user should still have access to the other group space, you can contact the other group's admin to request they be removed (you can find their contact info under the Settings tab > Group spaces page). You can also contact the user to recommend they update their default group space to yours. -
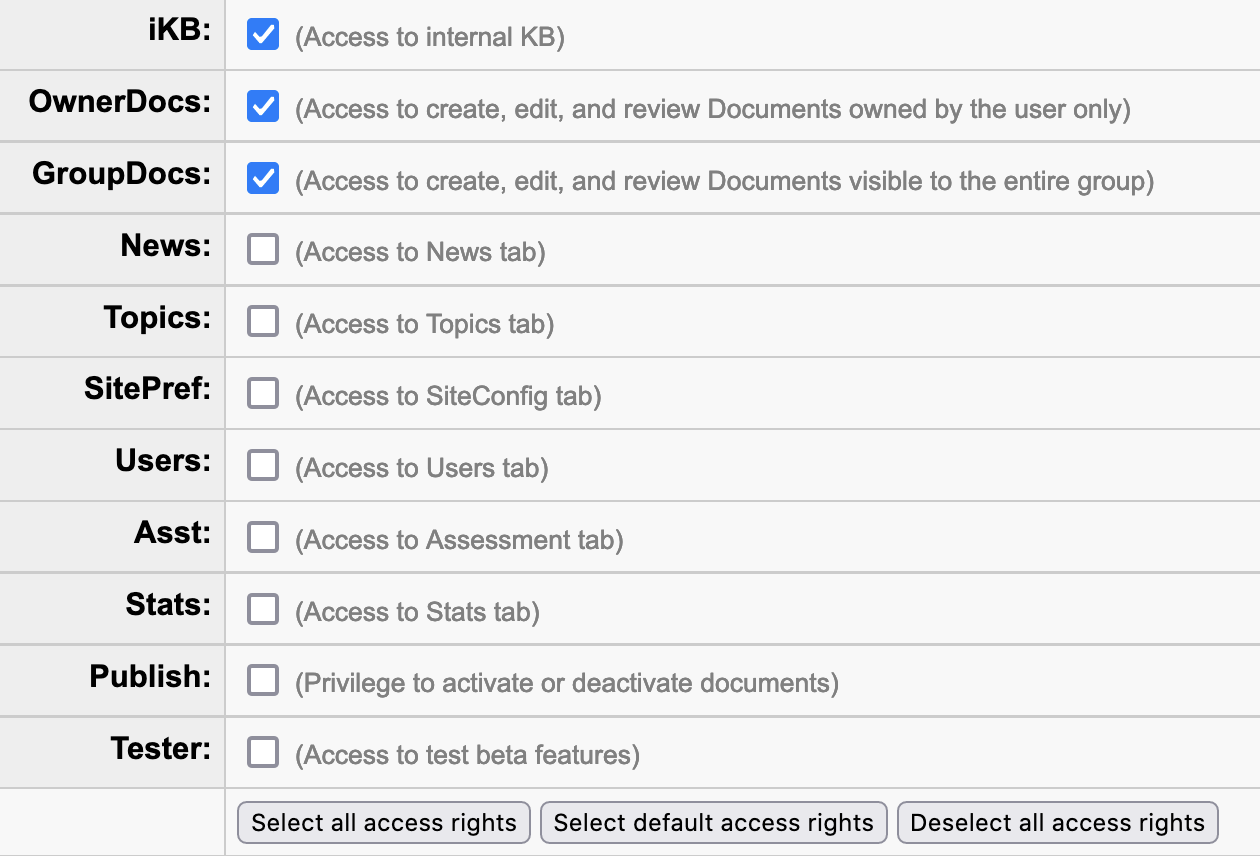
Select which permissions to grant the new user.

For a detailed description of each user permission, please see KB User's Guide - Users Tab - Overview of User Permissions.
You may also use one of the buttons below the checkboxes to easily set common combinations of permissions:
- Select all access rights buttons - Checks the box in every permission listed in the above table
- Select default access rights - Resets a user to the defaulted checked permissions: Active, iKB, OwnerDocs and GroupsDocs.
- Deselect all access rights - Deselects all permissions that have been previously checked.
Selecting permissions based on desired access
Choose access to grant user Desired Access: Check These Boxes:
Access to the internal KB (user can read docs on the KB but cannot create or edit documents).Check Active and iKB.
Do NOT check oDocs nor gDocs.
Create and edit only documents they ownCheck oDoc
(as well as Active and iKB (for internal sites))
Create and edit documents owned by anyone in the groupCheck gDoc
(as well as Active and iKB, and probably oDoc)Access the Topics, News, Settings, Users, Asst, or Stats tabs: Check the corresponding checkbox.
NOTE: Managers like to review stats, so be sure to give them access to this page.
Publish documents on either internal or external KB sites:Check Publish Test beta features on your KB Site (Please refer to [Link for document 93225 is unavailable at this time] for more information) : Check Tester Be considered a KB Group Administrator Check all available permissions
(Active, iKB, ... Publish) -
If desired, you may enter information the user's area of expertise in the Subject areas field. This is an optional free form text field that can be used from the full users table.
-
If your group has User Access Groups set up, they will appear in the User groups row. You can make the new user a member of one or more groups by checking them here.
-
Click on Add User at the bottom of the screen to finish creating new user account.
See Also
- KB User's Guide - Users Tab - Overview of User Permissions
- KB User's Guide - Users Tab - Viewing, Updating and Deleting Users
- KB User's Guide - Home Tab - Upload Profile Photo
- KB User's Guide - Home Tab - Updating Your Default KB Group Space via the Home Tab
- KB User's Guide - Documents Tab - Document Workflow
- KB User's Guide - Training - Basic Administrator Training

